Katana-Tutorial
Katana - Tutorial
The overall operation is similar to leveling with the R.M.LITE.
The added step is about adjusting either the tool to the neck, or the neck to the tool.
With the R.M.KATANA system, you can also perform a fret level with both the tool and the neck kept perfectly straight. It depends on the user’s choice. Some prefer to try a straight level the first time, just to test the system and get confident.
Step 1 — Prepare the Instrument
Do a proper setup on your instrument before starting. Make sure the neck relief and the string action are adjusted to a normal playing condition.
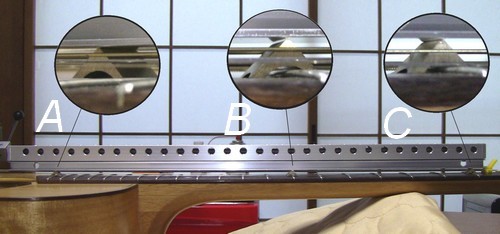
Step 2 — Position the Pyramids
Place the three Pyramids (gauges) at the extremities of the fretboard and one in the center. These will define the reference plane.
Step 3 — Adjust the Katana
Adjust the Katana so that the bottom of the tool touches all three Pyramids.
Tip: for more precision, you may set this adjustment without the abrasive strip applied yet.
Step 4 — Sanding Technique
- For best accuracy, use short strokes, ideally shorter than one inch.
- Move the Katana in an “X” pattern across the frets to make the abrasion more effective and linear.
- Always check progress frequently to avoid removing more material than necessary.
Step 5 — Playing Position or Support
The Katana can be used with the instrument laying on a support (as in the pictures), or in playing position (held vertically), depending on your preference.
👉 This method allows you to control both the tool and the neck, achieving a precision level that goes beyond traditional straight-line fret leveling.